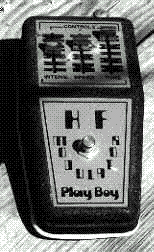
How I Built Fred

Part 8

The Base: Version II

I figured out a way to build a base that looked approximately like the ones in the movie by cutting out a deck from 1" plywood and 2" x 4"s. I removed the wheels from the bench in Version I and nailed them into place on Version II. Needless to say, this sucker is heavy.

View from underneath of base chassis

Version II base with bench mounted

Underneath V.II's base. The rubber skirting was stapled in, then the boards nailed over it

V. II's base with bench in place


Base corner detail I got an approximate rounding of the deck top edge using a different router bit. I also found some rubber sheeting for around the bottom, but I had to piece and patch several together to go all the way around.

Cheater guide to hide gaps around bottom of skirt I had to cheat a little with how the skirt sat on the base deck. I couldn't get a real flush fit, so I routered out a little trough for the skirt shape, then put some small pieces of narrow metal all the way around to both help hold it in place and hide the bad fit.

The Ring Modulator and other electronics

Ring Modulator unit had no knowledge of how to build any electronics I'd need for the voice. 
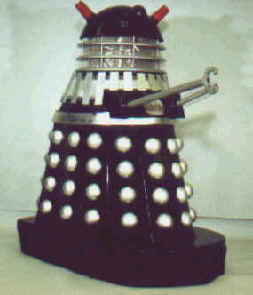
I'd installed the speaker in the front because I couldn't figure out how to put a speaker in the neck without a feedback problem from the microphone. The only kind of microphone I knew of was a condensor type, which picks up noise from everywhere. The portable PA system was built for me by someone who knew what they were doing. It worked off a 9-volt battery.

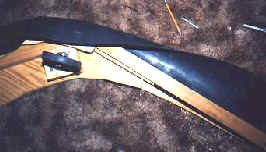
According to various references, the BBC used a Ring Modulator to distort the actors' voices. This was, of course, in a TV studio equipment situation. I needed something more portable. By about the 1970's, small units that approximated the originals were used for guitar effects. I managed to track one of these down at a music store for about $25 at the time.

The lights in the "ears" of the original Daleks were turned on and off by the operators inside, trying to match the dialogue as well as possible. I had it rigged so that the two small flashlight bulbs would be turned on and off via a "reed switch" installed in the kit that would open and close when I spoke into the microphone. Interestingly, the lights also dimmed and brightened, according to how loud I spoke. I originally used a seperate battery to power the lights themselves. I eventually found it more efficient to use a small 12 volt battery to power both the lights and the PA system. (I don't think I have a schematic for this anymore, but it's relatively simple.)

One final touch was hooking up an old Carbon Dioxide fire extinguisher to the gun, just like they did in the movies. I got permission to fire it off a few times at some masquerades, and that really "wowed" the audience!

Fred bits in our basement

Fred Version I just after first completion

Fred breaks down into 5 pieces, more or less: The head and neck, the shoulders, the skirt, the base, and the bench. I'd guess it all weighs close to 200 pounds. Not the lightest construction, but that's the way it worked out.

.Two swave and deboner bachelors at their pad

Me and Fred in our bachelor digs
with original movie poster

Accepting an award from Nicholas Courtney
At TARDISCon 1985
with Nick Courtney

Fred at Chicon V
Chicon V, 1991
(Version II)

Fred doesn't get out much these days. The last time was Costume Con 16, as a "greeter" with "Welcome" placard. I might try putting in a motorized cart sometime, but that would involve even more logistics problems. I'd need a truck or something. So, mostly, he lives in semi-retirement. But you never know -- he might make another appearance sometime.

Fred still remains one of my proudest achievements. I probably couldn't do something like this now, because of time and expenses. But what a way it was to begin a costuming hobby!

Additional photos by Greg Heuing, John Upton

Back Next

Back to Workshop